10 KiB
🏆 WSC2026 Test Project - Web Technologies
Module D: AI-Powered Global City Explorer (Full-stack Integration)
1. Project Overview
You are a full-stack developer for the 'Global City Explorer' platform. The internal AI Engineering team has developed an 'AI Middleware Server' using local AI models (Ollama) to analyze text information and extract keywords from images. This has been provided to you as a Starter Kit.
Your task is to run the provided AI server, analyze its APIs, and build a sophisticated Front-end (UI) where administrators can create, read, update, and delete (CRUD) city information. Furthermore, you must develop a robust Back-end (DB Storage) that processes and securely stores the data only after it passes strict server-side validation.
2. Infrastructure Setup
Before beginning the task, you must ensure that your local PC meets the requirements to run the AI models and the Node.js server, and configure the environment accordingly.
2.1. Hardware Requirements
To run the two AI models smoothly in a local environment, the following specifications are recommended:
- Memory (RAM): Minimum 8GB / Recommended 16GB+ (Both models need to be loaded into memory).
- GPU: NVIDIA GPU with 6GB+ VRAM recommended (CPU execution is possible, but image analysis processing time may be delayed).
- Storage: Minimum 10GB of free space (SSD is highly recommended over HDD).
2.2. Node.js Verification & Installation
A Node.js environment is required to run the back-end middleware.
- Open your terminal (or Command Prompt) and type
node -vto check the installation. (A version ofv18.x.xor higher is expected). - If not installed: Visit the Node.js official website (nodejs.org), download the LTS (Long Term Support) version, and install it.
2.3. Ollama (AI Engine) Verification & Installation
- Open your terminal and type
ollama -vto check the version. - If not installed: On Windows, run PowerShell as an Administrator and paste the following command to install:
irm https://ollama.com/install.ps1 | iex(After installation, you must restart your terminal to apply the environment variables.)
2.4. AI Model Download & Characteristics
Open your terminal and run the following commands sequentially to download the two AI models used in this project. (Verify the installation using the ollama list command).
- Download Text Processing Model:
ollama pull phi3- [Model Characteristics]: A Small Language Model (SLM) developed by Microsoft. It is lightweight and fast, possessing excellent text generation and logical reasoning capabilities, making it ideal for writing city introductions.
- Download Vision (Image) Processing Model:
ollama pull llava- [Model Characteristics]: A Multimodal AI equipped with 'Vision' capabilities alongside text. It analyzes uploaded landmark images to describe objects or scenery and extracts core keywords.
3. AI Middleware Server Setup & Execution
The provided Starter Kit contains an ai-api folder created by the AI engineering team. Inside, you will find server.js and package.json. (🚨 NOTICE: Do NOT modify the code in this server under any circumstances.)
- Open a terminal and navigate to the provided
ai-apifolder directory. - Enter the following command to install the required packages:
npm install - Once the installation is complete, start the server:
npm start - If the message
🚀 AI Middleware Server running on http://localhost:3000appears in the terminal, the server is running correctly. Do not close this terminal until the competition module ends.
4. API Testing via HOPPSCOTCH
Before starting your development, you must use Hoppscotch (or Postman) to test the two provided APIs and understand the format of the data they return.
-
API 1: Text Information Generation (
POST /api/generate-text)- Body (
application/json):{"city_name": "Paris", "country": "France"}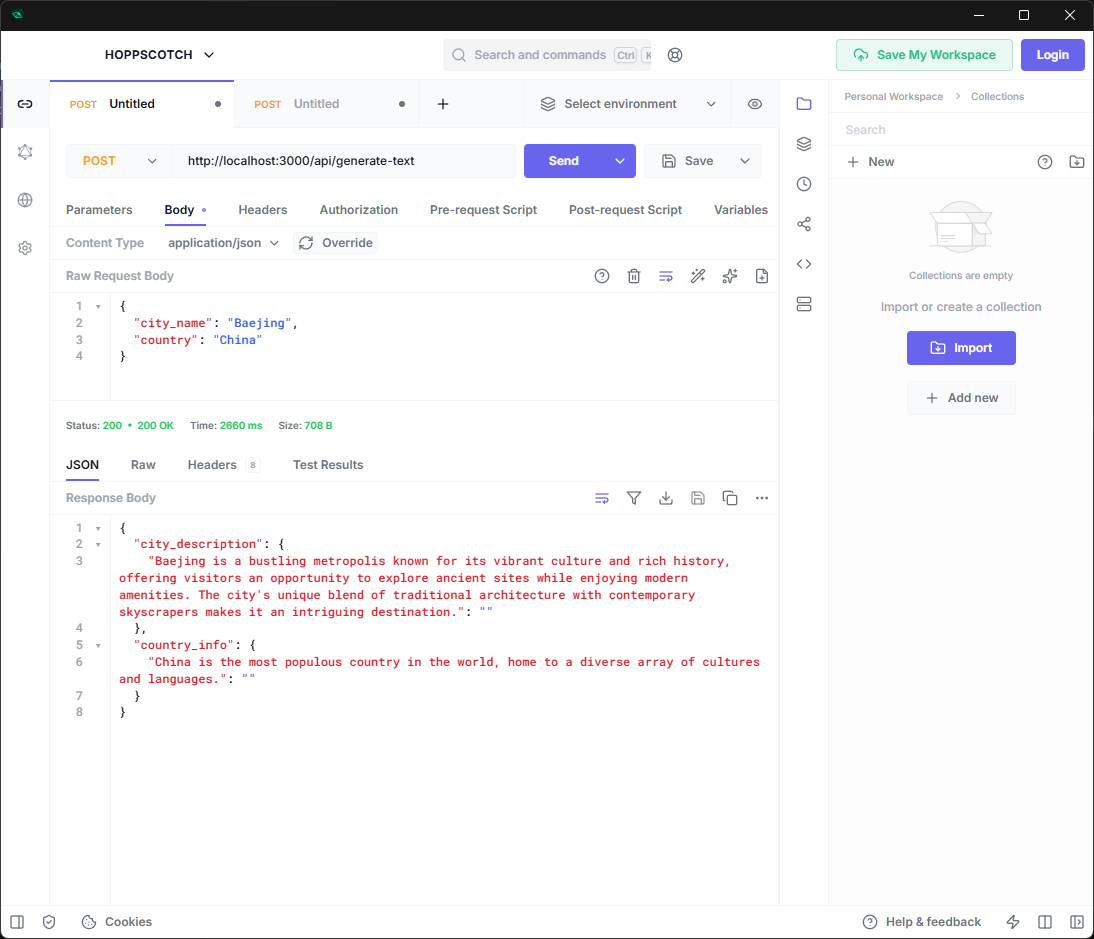
- Body (
-
API 2: Integrated Image Analysis (
POST /api/analyze-image)- Body (
multipart/form-data):city_name(Text),country(Text),image(File type for image upload)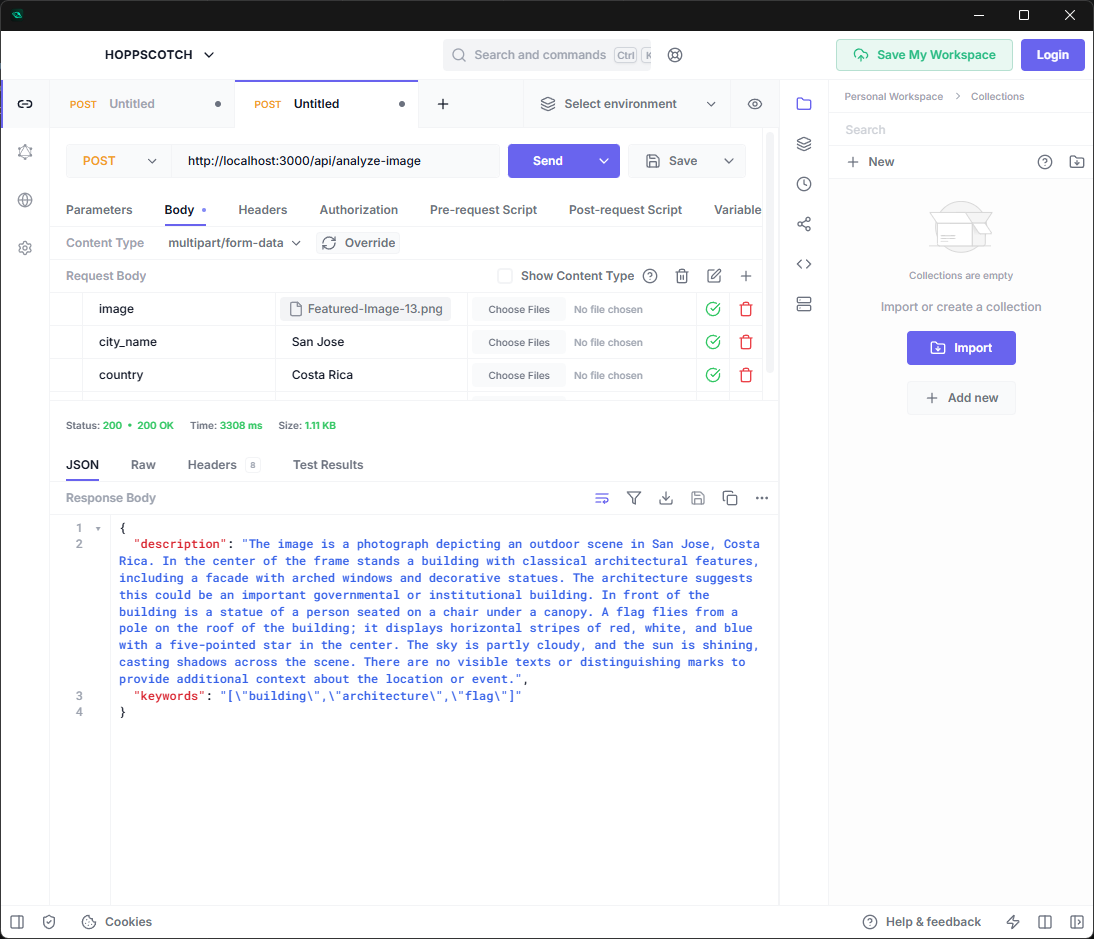
- Body (


5. Tasks to Complete
5.1. Front-end Requirements (Advanced UI/UX)
Build the index.html (or use an SPA framework) interface for administrators. The screen should be broadly divided into a 'Data Registration/Edit Area' and a 'Registered List View Area'.
-
[Data Registration & Edit Area (Form Area)]
- Image Preview: When an image is selected via
<input type="file">, an image thumbnail must instantly appear on the screen as a preview before it is sent to the server. - AI Data Integration: Call the AI text generation API after entering the city/country name, and call the AI vision analysis API after uploading a photo. Populate the form with the returned data.
- Form Lock & Loading (Asynchronous State Management): Because heavy AI analysis takes time (10~30 seconds), you must disable all input fields and buttons during the process to prevent duplicate clicks and user errors. Additionally, display a clear loading UI (spinner, progress bar, etc.) to optimize the User Experience.
- Edit Data & AI Re-fetch:
- Clicking an 'Edit' button on a specific city in the list should populate the form with that city's data.
- The edit form must include a 'Re-fetch All Info from AI' button. Clicking this button should trigger both AI APIs again based on the current city, country, and image in the form, entirely replacing the text values (description, keywords) with the newly generated AI response. The data will update in the DB only when the user clicks 'Final Update'.
- Image Preview: When an image is selected via
-
[List View & Filtering Area (List & Interactive Filtering)]
- Fetch the globally saved city information from the DB and render it visually in a List or Card Gallery format. Each item must include an 'Edit' and 'Delete' button.
- Delete Data: When the 'Delete' button is clicked, prevent accidental deletions by prompting the user with a browser native
confirmdialog or a custom Modal. Upon confirmation, delete the data from the DB and immediately update the list. - Hashtag Filtering: Clicking a specific keyword (e.g.,
#EiffelTower) displayed in the list must instantly filter the entire list to show only the city cards that contain that keyword.
5.2. Back-end Requirements (DB & Server-side Validation)
Construct your own back-end server and database to perfectly handle the Create, Read, Update, and Delete (CRUD) operations for your data.
- DB Schema: Design and create a
city_contentstable in MySQL/MariaDB. - API Implementation (CRUD):
- GET (Read): Returns all data saved in the DB in JSON format.
- POST (Create):
INSERTnew data into the DB and physically save the uploaded image to an upload folder. - PUT or PATCH (Update): Updates data for a specific ID. (If a new image is submitted, you must replace the old image file or update the new file path).
- DELETE (Delete): Removes data for a specific ID from the DB.
- Server-side Validation (Security Check): For POST and PUT/PATCH requests, ONLY data that passes the following validation checks should be saved to the server:
- File Size Limit: If the uploaded image exceeds 5MB, the server must reject the request and return an error message along with HTTP status code 400 (Bad Request).
- Extension Check: The server must reject the upload if it is not an allowed image format (
.jpg,.jpeg,.png,.webp).
5.3. Additional Requirements (Pitfalls & Evaluation Points)
- Data Parsing: Within the Vision API's response, the
keywordsare not returned as a pure array, but as a Stringified Array wrapped in JSON format. To render these cleanly as individual tag UIs, the front-end MUST execute proper parsing (JSON.parse). - Exception Handling: If the back-end validation fails (e.g., File size exceeded), the front-end application must not crash. It must catch the error and clearly notify the user via an
alertor Modal window.
6. Competitor Workspace Guide
- AI Middleware Execution Location: The provided
ai-apifolder. (Run in Terminal 1 and leave it active). - Competitor Workspace: Your web server's root folder (e.g.,
http://localhost/module-d/). - Evaluation Preparation: At the end of the module, both the AI Middleware terminal and the web server you created must be running. Experts will connect via browser and sequentially test the following cycle:
- Attempt to upload an image exceeding 5MB (Check Error Handling)
- Normal data generation (Create)
- List view and Hashtag click filtering (Read & Filter)
- Click 'Edit', 'Re-fetch from AI' to renew contents, and Save (Update)
- Click 'Delete' to permanently erase data (Delete)
7. Appendix: Sample Data
Utilize the city/country list below for testing and final demonstration. Recommended landmark images for testing are provided in the sample-images folder inside the Starter Kit. (Prepare at least one high-resolution image larger than 5MB to test your back-end defense logic).
| City Name | Country Name | Landmark |
|---|---|---|
| Paris | France | Eiffel Tower, Louvre Museum |
| Seoul | South Korea | Gyeongbokgung, N Seoul Tower |
| Tokyo | Japan | Tokyo Tower, Shibuya Crossing |
| New York | USA | Statue of Liberty, Times Square |
| Rome | Italy | Colosseum, Trevi Fountain |
| Sydney | Australia | Opera House, Harbour Bridge |
| Cairo | Egypt | Pyramids of Giza, Sphinx |
| London | UK | Big Ben, London Eye |
8. Mark Summary (Total: 25 Marks)
This table provides a summary of the points allocated per evaluation category. A detailed Marking Scheme will be provided separately.
| Category | Description | Max Marks |
|---|---|---|
| A. Front-end UI & UX | UI composition, Async state management (Loading/Locking), Data binding & Parsing | 7 |
| B. Data Interaction | Data list rendering and Hashtag-based filtering functionality | 5 |
| C. Back-end CRUD API | DB & File System Create, Read, Update (including AI Re-fetch), and Delete operations | 8 |
| D. Security & Validation | Server-side file size/extension validation, Client-side exception handling | 5 |
| Total Marks | 25 |